Stable Management Knowledge and Care of Horses

3 Comments

Correctly Handling Horses

Precaution and common sense should be the key elements whenever you are approaching and handling horses. They are living creatures with a mind and will of their own and should be treated with a firm yet respectful hand. Take care when handling horses in order to keep you, other people, and the horse safe, and to prevent accidents. Consistency also helps the horse to understand his role in the relationship and behave appropriately.

Horses have been domesticated for many years but they still rely on their natural instincts to stay safe. If they feel threatened they will try to run away or, if cornered, can kick or bite to protect themselves. Whenever you are around horses you should be calm, move slowly, and speak softly. Loud or sudden movements or unexpected noise could startle them. Different surroundings or experiences can also cause a horse to become nervous. If this happens pat and stroke him gently and speak calmly and reassuringly to him.

Whenever possible, approach a horse towards his shoulder rather than straight towards his face or from behind. Due to the placement of the horse's eyes on the side of his head, he has a good all-around vision but does have a blind spot directly in front and behind. Let him know that you mean him no harm by walking slowly and talking to him in gentle tones. If he will let you, stroke his neck or shoulder rather than his face or nose.

If he is tied up and must be approached from behind, let him know you are there by talking to him before you approach. Although he can see behind him he does have a blind spot directly behind his rump. NEVER approach a horse directly from behind without first talking to him as he might be snoozing. If you startle him he could kick out in defense. Once he hears you and turns his head and can see you it is usually safe to approach him. Be vigilant and calm at all times.

Some Basic Rule For Correctly Handling Horses

  • do not run, shout, or make loud noises around horses
  • remember that some things that we take for granted might seem scary to a horse if he hasn't encountered them before. These can be anything from dogs, chickens, and other unfamiliar animals to balls, children's toys, or items blowing in the wind, etc.
  • pay attention to where your horse puts his feet. He might accidentally step on your foot and not even realize. You should ALWAYS wear strong, sturdy footwear at the barn and never approach a horse in sandals, flip-flops, or bare feet.
  • avoid being around the rear of a horse unless you are working on him i.e. grooming, picking out his feet, applying a tail bandage, etc. If you have to be behind a horse use caution and keep one hand on him at all times. If he moves quickly you will not only see this movement but also feel it and be able to act accordingly.
  • have BOTH feet on the ground at all times (sometime this rule may have to be broken if you are braiding the mane of a tall horse, more about that later). Do not sit or kneel on the ground near a horse as that would make it too difficult to get out of harm's way should the need arise.
  • do not take food into a field full of horses even if you have a horse who is difficult to catch. If you are surrounded by a group of horses all trying to get to the food you are in a very dangerous position.
  • when you are handling horses around other people you need to also be aware of their actions and behavior. Politely show them how to behave and act in order to keep everyone safe.

How to Catch a Horse

Some horses are easier to catch than others and some are almost impossible to catch. For the purpose of this explanation, we will assume that the horse is reasonably easy to catch. (We will cover in a later blog series how to retrain a horse that is difficult to catch). One way to avoid ending up with a horse that is difficult to catch is to ensure that you catch your horse for reasons other than work. Catch him, from time to time,  just to groom him or give him a treat and he will be far more likely to come to you in the field.

How to catch a horse
Safely catching a horse and bringing him in from the field.

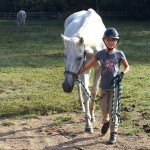
Enter the field calmly but with purpose. Walk towards your horse's shoulder, rather than his face or hindquarters, and call his name softly. Make sure that he has seen you, then walk up and slip the lead rope around his neck. Pat him gently on the neck or shoulder. With the lead rope still around his neck, carefully put on his halter (see next paragraph). Lead him out of the field making sure to avoid any of the other horses that are in there with him. If there are horses gathered around the gate area use a stern but quiet voice and, if necessary, hand gestures to make them move. Do not lead a horse through a group of other horses as this would put you in a dangerous position. Open the gate wide enough for both of you to get through safely but not wide enough that any other horses could escape. You might want to take someone with you to hold the gate until you feel comfortable doing this alone.

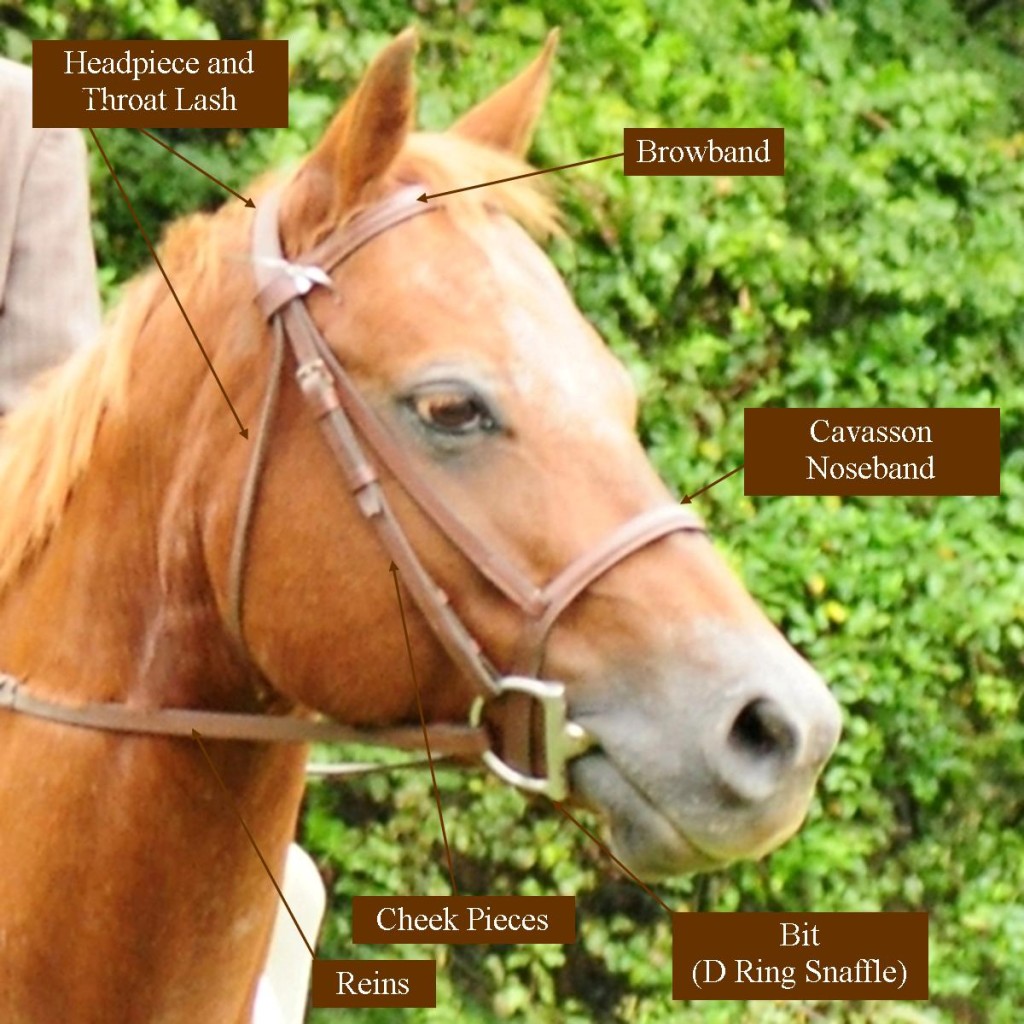
How to Put on A Halter

If a horse is loose in a stall or a field you will need to catch him and put on his halter. To halter a horse stand close to his left shoulder, facing forward. Loosely loop the lead rope around his neck to keep him still. Some halters have a buckle and some have a clasp, therefore, fitting them will be slightly different depending on which kind you are using.

Using a Halter With a Buckle

Standing near the horse's left shoulder and facing forwards, hold the halter buckle in your left hand and the crown-piece (strap) in your right hand. Reach under his neck with your right hand and guide his nose carefully into the noseband. Pass the crown-piece over the top of his poll and attach it to the buckle on his left cheek.

Using a Halter With a Clasp

Standing near the horse's left shoulder and facing forwards, make sure the clasp is open on the halter. Guide his nose into the noseband and gently lift the crown-piece over his ears, one at a time. Reach under his chin for the clasp and attach it to the ring on the left side of his cheek.

How to Lead and Turn a Horse at Walk and Trot Up In Hand

You should always use a halter and lead rope to lead a horse unless he is bridled. Never lead him by holding onto the halter. If something goes wrong and you let go he could run off and endanger himself or others or he could drag you off balance causing you injury.

A horse should be accustomed to being led from either side but the most accepted way to lead a horse is from the left (near side). The lead rope should be attached to the center 'O' ring under the horse's jaw. Hold the lead rope, in your right hand, close to the ring but DO NOT put your hand on the ring or your finger through it. Hold the remaining lead rope folded in your left hand. DO NOT wrap any of the lead rope around any parts of your body.

Ask your horse to walk on by standing near his left shoulder facing the direction you wish to go. Say 'walk on' and start to move. Most horses will oblige and start to walk. If he does not walk do not be tempted to get ahead of him or start pulling on his head. Carry a crop in your left hand and, reaching back behind you, tap him gently on this flanks. If you don't have a crop with you, you can use the loose end of the lead rope. You should continue to look ahead and remain next to his shoulder. Once he starts to walk make sure that your right arm is outstretched so as to keep him at arm's length preventing him from stepping on you by accident.

To turn a horse you are leading, whenever possible, turn him away from you. Steady him by putting a little pressure on the halter by pulling very slightly on the lead rope. Move your right arm further away from you and move him to the right. Stay at his shoulder. By turning him this way he is more likely to stay in balance than if you pulled him towards you. He is also less likely to step on you as he turns.

To make him trot do the same as you did to make him walk. Stay next to his shoulder, say 'trot on' and start to jog. If he does not move into the trot use the crop behind your back with a gentle tap on his flanks. The lead rope should be slack enough to allow him to carry the weight of his head naturally but not so slack that he, or you, might get your legs caught up in it.

Leading and trotting a horse up in hand, along with standing a horse up (see next section) is usually done without a saddle for either a veterinary inspection, for someone considering buying the horse, or for a judge at a show. The horse should be able to move freely and confidently but not hurried or unbalanced. If you need to lead a horse in an unfamiliar setting it would be best to put him in a bridle, instead of a halter, which would give you more control. It is usual to walk a horse away from the person inspecting it and then directly back towards them. They should move out of your way allowing you to pass by them. They will then usually ask you to do the same in trot.

How to Stand a Horse Up Correctly

The term standing a horse up simply means he is standing still, looking attentive, and showing his conformation to the best advantage. He should stand square. This means his front legs and back legs should be next to each other with his weight evenly distributed between all four legs. If he isn't standing squarely move him forwards slightly and stop again until he is. You should stand in front of him facing his head so that you don't obstruct the view of the person looking at him. If he is wearing a halter place one hand on each side of the noseband with the end of the lead rope in your left hand. If he is bridled hold one rein in each hand near to the bit. Raise your elbows slightly so that he doesn't try to nibble your wrists.

How to Hold a Reasonably Quiet Horse for Treatment, Shoeing, or Clipping

No matter how often your horse has been tied and expected to remain in one place there may come a time when you have to hold him for some reason. Whatever the reason, the most important thing is that you and the horse are both secure and safe.

Holding a Horse for Treatment

If your horse needs to be treated by a vet, the best thing to do is to listen carefully and follow their instructions. However, you know your horse and you might want to suggest that they treat him either in the stable or out of the stable depending on whichever he prefers. If you think he might be difficult to control it would be best to put him in a bridle instead of a halter. Do not tie him up. If you are using a halter and lead rope you could thread the lead rope through the Equi-Ping™ or breakable string but do not tie it, not even with a quick release knot. Your horse will probably think he is tied up but it still gives you the freedom to act should a difficult situation arise. Stand on the same side as the vet, unless they tell you otherwise. Do not, however, get in their way. When the vet has finished the treatment listen carefully to their instructions and be sure to follow them exactly. If they are complicated, write them down.

Holding a Horse for Shoeing

The same as above would apply but it will not always be possible to stand on the same side as the farrier as you might get in his way. If necessary, stand facing the horse as you would when standing him up.

Holding a Horse for Clipping

The same as above. Listen to the person doing the clipping and do as they ask.

How to Tie a Horse Up

The best way to secure a horse is either with a halter and lead rope or with a halter and cross ties. NEVER tie a horse up with a bridle. It is an expensive piece of tack to replace if broken. It can also result in a broken jaw of you tie up to the bit and the horse pulls away suddenly.

Tying Up to a Single Securing Ring

The lead rope should be fastened to the 'O' ring at the back of the noseband. Always use a quick release knot and NEVER tie directly onto the securing ring but instead use an Equi-Ping™ or breakable string (bailing twine works well for this). Although the reason for tying up the horse is to secure him in one place, it is very dangerous if he tries to break free and cannot. He could seriously injure himself in any struggle that might ensue. It is better for him to break loose.

Unless the horse is very trustworthy only tie him up in a stable or another enclosed place. Never tie him to an unsafe object such as a loose fence or thin branch on a tree. The securing ring should be placed high enough so that he cannot get his legs caught over the lead rope. Never tie him to a hay net. (Do not tie the hay net to the breakable string, it should be tied directly to the securing ring). If the horse tends to chew the lead rope either soak it in an unpalatable (but not poisonous) substance or use a chain. If you use a chain the breakable string should be between the chain and the halter not on the securing ring. You wouldn't want your horse to break loose and drag a chain along with him.

Cross-Tying

Cross-tying is very popular in America and is a means of tying a horse with two lead ropes or chains rather than just one. The horse is positioned between two walls or strong posts about 6 ½ feet apart, with the ropes or chains fastened to the Ds on each side of the halter. In barns where this kind of tying up is common practice, the cross-ties are permanent fixtures. They should always have some kind of Tie Safe™ or quick release mechanism attached to them. Do not use them if they don't. They are often used in grooming or wash stalls as they do not allow the horse to move as much thereby giving you more control. They should always be used if you are transporting a horse in a double trailer without the center partition.

How to Turn a Horse Out in a Field

When you are ready to turn your horse out into the field lead him there in either a halter or bridle. Usher away any horses that might be standing at the gate. Open the gate wide enough for you both to pass through safely. Make sure you close and latch the gate behind you. Walk him a little way into the field and turn around to face the gate. By doing this he will have to turn around before he can run into the field to join the other horses. If you let him go while he is facing into the field he could run over you by mistake in his haste to join his friends. If there is more than one of you turning horses out, make sure you all let go of them at the same time. If you do not follow this simple rule you could be dragged along if your horse tries to run off before you have let him go.

Whenever you are around or handling horses safety is of the utmost importance. By following the rules above you should be able to enjoy your time at the barn and around horses and ponies.

Previous Blog - Identifying Horses
Next Blog - Grooming a Horse

The content of this blog is copyrighted ©. It may not be reproduced in print or electronically without the written permission of White Rose Equestrian Center. It may be shared socially if linked back to this website. For more information contact us.

Disclaimer: We do not warranty any of these companies or products. These are items we use/have used and find them suitable for our needs. You should research these products before purchasing them. We are not sponsored by any of the aforementioned companies or products. These products have been bought by us for our own use. The links are affiliate links.

Follow our every move and keep up-to-date with tips, advice, and events, etc.

Facebook White Rose Equestrian Contact Us Twitter White Rose Equestrian Contact Us Google+ White Rose Equestrian Contact Us YouTube White Rose Equestrian Contact Us

3 Comments

Grooming a Horse

It is necessary to regularly groom your horse not only to keep him clean but also to inspect him to ensure that he is healthy and not injured in any way. You should groom, or at least, check your horse every day even if you do not ride. He must be clean before he is ridden or tacked up, to prevent sores caused by the tack rubbing against his dirty or muddy skin. Over the years many new products have been introduced to the market that horse owners feel they just have to buy for their ever-expanding grooming box. However, we have listed below the essential items that every grooming tote should contain.

Basic Items of a Grooming Kit

  • body brush - a soft bristled brush used for removing dust and scurf from the coat, mane, and tail. It usually has a flat back and broad, material handle. I particularly like the flexible type of body brush as it contours to the horse's body better than a regular kind. Do not use on grass kept horses as it removes too much of the natural oils that keep a horse warm and dry.
  • curry comb - the metal type of curry comb is used for cleaning the body brush and should never be used on a horse. Plastic curry comb and rubber curry combs are also be used for this purpose but can be used on a grass kept horse to remove dry mud.
  • cactus cloth or all-purpose grooming mitt - this is a slightly abrasive cloth that is used to remove dry mud or sweat marks
  • dandy brush - a hard bristled dandy brush is used for removing heavy dirt, dried mud, and sweat marks. It is most useful on a grass kept horse. Do not use on a clipped horse, a horse with sensitive skin, or on any part of their face as it is too harsh. Some of the modern dandy brushes on the market have soft bristles and do not work well for this purpose.
  • hoof pick - used for picking out the feet. If you get a hoof pick with the bristles opposite the pick it can also be used to clean the outside of the hooves.
  • hoof oil and brush - hoof oil is used for oiling the hooves to protect them from cracking and splitting (usually in summer) or too much moisture (usually in winter).
  • mane comb - use a mane comb to pull and braid manes. I like this style of mane comb with a long handle as I find it easier to hold. Do not use combs to de-tangle tails as they break the hairs.
  • massage pad - used to massage your horse's muscles, especially after exercise, and to promote circulation (see strapping below).
  • sponges - you will need, at the very least, two sponges. One for cleaning around the face; eyes, nose, and muzzle, and one for cleaning the dock.
  • sweat scraper - to remove surplus water or sweat. These aren't used in everyday grooming. There are two types to choose from. The half-moon style or, my favorite, the metal sweat scraper.
  • water brush - a soft bristled brush to dampen down the mane and tail and wash the feet. You could also use a sponge for this job if you prefer.

There are other items you may need in your grooming kit depending on the time of year and discipline that your ride, and area of the country you live, for example - fly repellent, elastic bands or needle and thread for braiding, scissors and clippers for trimming, etc. The list could go on and depends very much on what you feel you need. Horses that live most of their lives in a stable should be groomed thoroughly every day. Horses kept at grass do not need that much attention as too much grooming will remove the grease naturally present in the horse's coat. The grease helps to keep them warm and dry. You should wash your grooming kit once a week in warm soapy water. A mild disinfectant may be added. Once you have washed the dandy brush you should dip the bristles in cold water. This helps to keep them stiff. It is important to keep your grooming supplies clean as you can not clean a horse with dirty brushes. Grooming a Horse Before you begin to groom your horse he should be tied up correctly as described in the previous blog post Correctly Handling Horses. Do not try to groom a horse who is loose in a field or stable. If they try to get away from you, you will have no control over them. If you do groom them in their stable be sure to remove all food, water, and buckets to prevent them from becoming contaminated with dust and dirt.

How to Groom a Horse

There are four different types of grooming. Whenever grooming a horse make sure that he is comfortable at all times. If the weather is cold and he is wearing a blanket unbuckle it and fold it in half keeping it on his rear end. Brush the forehand on both sides before replacing the blanket, then fold it up over the forehand and brush his hind end. This prevents him from getting cold.

Quartering

This process is a quick brush with a dandy brush and curry comb to remove stable stains and make him presentable and clean enough to ride. Horses that are clipped have sensitive skin. A cactus cloth instead of a dandy brush as it isn't as harsh. Sponge his eyes, nose, and dock, and pick out his feet. Quartering is adequate for a horse that lives outside in a field. Depending on which part of the country you live in or what time of year it is you might also need to check him for ticks and spray him to repel flies in summer.

Full Groom

A full groom is best done after exercise and is described below in the Method of Grooming section. Grooming is more effective when the horse is warm as his pores will be open. Full grooming is not recommended for grass kept horses as it removes too much of the natural grease that keeps the horse warm and dry.

Strapping

This is a massage used to harden and develop muscles on stabled horses in consistent work. It invigorates the blood supply to the skin and makes the coat shine. Originally a wisp made of woven hay or straw would have been used but nowadays most people use a soft massage pad with rollers (see the image of Basic Items for a Grooming Kit). Slap the muscles in a regular rhythm in the direction the coat lays. Only massage the muscles on the neck, shoulder, quarters, and thighs. Do not use on an unfit horse as their muscles aren't strong enough for a vigorous massage.

Bush-Over or Set-Fair

For a stabled horse, at the end of the day, you should lightly brush him over when you straighten or change the blankets. This is the time that you also remove any droppings from his stall and tidy his bedding to make him comfortable for the night.

Method of Full Grooming

  • picking out the feet - using the hoof pick, pick up his feet one at a time. First, talk to him then face his tail. Start with his front leg and run your hand, closest to his body, down the back of his leg. When you reach the fetlock say 'up' and squeeze the joint. Catch and support his leg under the hoof. If he doesn't lift his leg you may need to lean gently against him with your shoulder to push his weight onto this other leg. Pick the hoof from heel to toe making sure you avoid the frog (the softer triangular, center of the hoof). Make sure you carefully clean the cleft of the frog (the groove down the middle), and the bars down the side.

To pick up the rear foot stand next to his hip facing his tail. Speak to him and run your hand, nearest to him, down the back of his leg to the point of the hock. Then move your hand to the front of the cannon bone. When you reach the fetlock say 'up'. When he lifts his leg place your hand under the hoof from the inside. Do not lift it too high or pull it too far back as this will make him unbalanced. If he doesn't immediately lift his foot you may need to lean slightly against his hip to push his weight onto his other foot. Most well-trained horses will anticipate the next leg you need him to pick up and raise it slightly ready for you.

Look for any signs of injury or thrush. Save time by picking into a skip (small, low container). This keeps the dirt out of the bedding if you are in the stall and saves you from having to sweep up no matter where you are. Tap on the shoe to make sure it is not loose.

  • dandy brush - for a grass-kept horse you should use the dandy brush all over his body to remove dried mud and caked on dirt. It can be held in either hand. Start at the poll on the left (near) side and work over all the body and down the legs. Use short, flicking strokes to get all the dirt out from the long hair. Do not brush too hard on sensitive areas. On a stabled or clipped horse, the dandy brush is only used where his coat is long. With the introduction of the rubber and plastic curry comb, some people prefer to use them at this point in the grooming process.
  • cactus cloth - this can be used on a stabled or clipped horse, instead of the dandy brush, to remove stable stains, dirt, and sweat marks. It can also be used on horses with sensitive skin.
  • body brush and curry comb - the body brush is the main brush used on a stabled horse. It's used to remove dirt, dust, and scurf from the skin. The curry comb is used to keep it clean.

Start with the mane. Throw the mane over to the opposite side of where it would normally lay. Brush the crest and exposed neck area. Then gradually pull the mane back a little at a time and brush through each section.

Once the mane is done work on the rest of the neck and progress down to the shoulders. Use short movements with enough pressure to penetrate through the hair to the skin. After every few strokes scrape the body brush against a curry comb to clean it. When you are grooming the left side of the horse the body brush should be in your left hand and the curry comb in your right. Switch them over to the other hands when you groom the right side. Use the body brush all over the horse including the legs.

The body brush can also be used on the head and forelock. When brushing the face untie the horse. You don't want him to suddenly pull back and feel like he can't get away. You can leave the lead rope threaded through the breakable string and hold onto the loose end. If you are using cross-ties unclip them and clip the lead rope onto the 'O' ring. Unfasten the halter and temporarily place it around the horse's neck. Hold the lead rope with one hand and gently brush his face with the other hand.

The body brush can also be used on the tail. If the tail is very tangled use your fingers to tease out the knots before brushing. Never use a metal comb on the tail as it breaks the hairs. Stand to one side facing backward when brushing the tail. The only time you should ever stand directly behind a horse is when applying a tail bandage.

  • sponges - dampen one of the sponges and clean his eyes, nostril, and muzzle. With the other sponge wipe underneath his tail and the dock area. It's a good idea for the sponges to be different colors so that you don't get them mixed up. They must be cleaned regularly.
  • water brush - use the water brush to 'lay' the mane and tail. Dip it in a bucket of water and shake off any excess. Dampen down any stray hairs on the mane. You can also use it to lay down the hairs at the top of the tail. This would be the time you would apply a tail bandage if necessary.
  • hoof oil and brush - when the feet are clean and dry you may paint them with hoof oil. It is beneficial in summer when hooves tend to be dry and brittle and also in winter when the ground is wet. This also helps with the overall appearance when a horse is being formally inspected.

How to Wash a Horse

Although we all do it, it is not recommended that you wash your entire horse. Shampoo, no matter how mild, strips the coat and skin of oils that naturally provide protection against wind, rain, and flies. If you must wash your horse he will need to be blanketed for about a week until the oils return if he will be outside in inclement weather.

Washing the Mane

Before you begin to wash the mane you should brush it thoroughly with the body brush (see the body brush and curry comb section above) or a human hairbrush. Wash stalls are becoming more popular and make washing the mane much easier. If you do not have access to a wash stall you can use a bucket of warm water and a large sponge or water brush. Either way, wet the mane thoroughly starting at the withers.

If using a hose run the water onto the horse's front leg first and gradually move up his shoulder to the withers. This way it doesn't come as too much of a surprise to him. Pull the forelock back through his ears to join the top of the mane. Use a sponge or water brush to help the water to penetrate deep into the mane. Once the mane is thoroughly wet use a mild shampoo and work it into the mane. When you have washed the entire mane rinse it thoroughly starting at the poll.

Be careful not to get soap or water in the horse's eyes or ears. Make sure the water runs clear and is free of any shampoo. Use the sweat scraper to remove the excess water from your horse's neck. Some people like to also use a conditioner. This gives the mane a soft fluffy appearance but doesn't work well if you plan to braid.

Washing the Tail

As mentioned above this is easier if you have access to a wash stall but can still be done with a bucket and large sponge or water brush. As with the mane, make sure that the tail has been brushed through thoroughly with a body brush or human hairbrush before you begin to wash it.

Wet the tail thoroughly either with the hose or by submerging it in the bucket. You need to know your horse well and how he will react before attempting either of these procedures. Whenever the dock of a horse is thoroughly wetted the horse usually buckles slightly with their back legs and appear as if they will fall down. This passes quickly and helps if you speak gently to them to reassure them that everything is ok. If you are using warm water this is less likely to happen as it won't be too much of a shock to the horse.

When the tail is completely wet, shampoo and rinse thoroughly. Squeeze out excess water with your hands and swing the tail gently to remove any remaining water. If you want to apply conditioner to the bottom of the tail you can do so and rinse it thoroughly. Do not apply it to the top as it will give it a 'fly away' look. While the tail is still damp apply a tail bandage.

Washing the Feet

Do not wash your horse's feet too often as overexposure to moisture is not good for them. Sometimes, however, it is necessary to remove excess mud. Use the water brush dipped in warm water. Using the thumb on your hand, that is holding up the foot, press it into the hollow of the heel to prevent water from seeping in there. If your horse's feet need to be washed in winter or if they are likely to be wet regularly smear petroleum jelly onto the heel to help prevent cracked heels or scratches.

Washing a Horse

If you really must wash your horse make sure it is on a warm day when he won't become chilled. Start with the mane and work down one side. Wet, wash, rinse, and use the sweat scraper as you go. Do not allow him to stand completely wet or allow the shampoo to dry on his skin. Finish with his tail. Be sure to offer extra protection until the natural oils return.

Previous Blog - Correctly Handling Horses
Next Blog - Basic Horse Equipment and Use

The content of this blog is copyrighted © and may not be reproduced in print or electronically without the written permission of White Rose Equestrian Center. It may be shared socially if linked back to this website. For more information contact us.

Disclaimer: We do not warranty any of these companies or products. These are items we use/have used and find them suitable for our needs. You should research these products before purchasing them. We are not sponsored by any of the aforementioned companies or products. These products have been bought by us for our own use. The links are affiliate links.

Follow our every move and keep up-to-date with tips, advice, and events, etc.

Facebook White Rose Equestrian Contact Us Twitter White Rose Equestrian Contact Us Google+ White Rose Equestrian Contact Us YouTube White Rose Equestrian Contact Us

2 Comments

Basic Horse Equipment and Use

The kind of horse equipment you need will depend on which equine activity you participate in. This blog concentrates on the basic horse equipment needed to safely enjoy and ride your horse.

Horse equipment is called saddlery or more commonly, tack. It consists of a saddle (fitted with a girth, stirrup leathers, and stirrup irons) and a bridle with an appropriate bit.

Leatherwork

The best material for tack is good quality leather. Cheap tack is often low-quality leather. It can be hard and brittle and not last as long. Tack is an expensive investment but if looked after correctly it can last you a very long time.

It is vital that:

  • the tack fits the horse and rider (more about this in an upcoming blog)
  • it is the correct type for the job you and your horse will be doing
  • you take good care of it by regularly cleaning it (more about this in an upcoming blog)

Buying Used Tack

Make sure that the leather is good quality and in good condition. Stitching should be strong and not perished. It is imperative when buying a used saddle that the tree is not broken or twisted. To check for a broken tree hold the cantle of the saddle against your hip and try to pull the pommel towards you. If it is a fixed tree there shouldn't be any movement at all. If it is a spring tree you should feel a gentle flexing that springs back into place when you release the pressure. To check for a twisted tree look from the cantle towards the pommel to make sure they are in line with each other. Also, check that the front arch under the pommel does not move or make a noise when you put pressure downwards onto it. Wrinkled or stretched leather on the seat can indicate there is probably some internal damage to the saddle and you shouldn't buy it.

Synthetic Tack

Synthetic tack is becoming more and more popular and can be a cheaper alternative. It is also lighter than leather which makes it easier for children to handle. If you do decide to buy synthetic tack make sure it is a reputable make as some of the non-named brands are cheaply made and do not last very long. I personally do not like synthetic tack but I have friends who swear by it so it really is a personal decision.

Metalwork

The metalwork on your saddle and bridle (stirrup irons, buckles, bits, etc.) should be made of top quality steel. Stainless steel is the best as it resists staining and discoloration, doesn't chip or flake, and is very durable. Nickel (often found on cheap tack) can be dangerous as it is much softer and can bend or break.

Bridles

The Parts of a Bridle and Functions

  • Headpiece and Throatlash - made from one piece of leather. Together with the cheek pieces, the headpiece supports the bit. The throatlash helps to keep the bridle in place by fastening loosely under the horse's throat. When fitted correctly you should be able to fit four fingers, sideways, between the leather and the horse's neck.
  • Browband - this lies across the brow of the horse and prevents it from slipping back. It should be tight enough so as not to sag away from the head but not so tight that it causes the headpiece to rub the back of the ears.
  • Cheekpieces - these attach to the headpiece at the top and the bit at the bottom. They should be snug enough to hold the bit in place but not so tight that the bit pulls up into the horse's mouth.
  • Bit - the bit attaches to the cheekpieces and reins. It should protrude about a ¼ inch or the width of your little finger at each side of the horse's mouth. When the bridle is on the horse the bit should make the horse look as if he is very slightly smiling. Bits can be made of copper, sweet iron, or aurigan to give the bit a more palatable taste for the horse and encourage salivation. For a more robust feel, some horses prefer a bit made of vulcanized rubber. Often times you will have to try a few different bits before you find one your horse really likes.
  • Reins - attach to the bit and are used to help steer the horse. They are available in different types of material.
    • Plain leather - they look very smart but can be slippery when wet
    • Leather With Grips - these have good grip but only at certain intervals along them so can be restrictive for subtly altering the amount of contact
    • Laced or Plaited - less slippery than plain leather but more expensive and more difficult to clean
    • Rubber Over Leather - these give the best grip especially in rain or on a sweaty horse. One option with these reins is Rainbow Reins with bands of different colors. These are great for teaching novice riders where to hold the reins.
    • Rubber Reins - usually used with a rubber (rather than leather) bridle. They are very easy to keep clean as you can wash them with soap and water but are slippery and not very pliable
    • Nylon Reins - not very popular with English riders anymore
  • Noseband - the cavesson noseband is the standard type and the only kind to which a standing martingale can be attached. You should be able to fit two fingers under it at the nose. There should be a 'two-fingered' space under the projecting cheekbone.

Parts Of A Bridle

Parts of a Bridle

Saddles

There are many different makes and models of saddles available. The main types are:

  • Jumping Saddle (Close Contact) - has a flat seat with the panels cut forwards. Designed for riding with shorter stirrup leathers it can have large knee-rolls which help to keep the rider's legs in the correct place.
  • Dressage Saddle - has a deep seat and straight cut flaps. It usually has extra long billets and uses a shorter dressage girth. This design allows the rider to sit deep with the correct leg position.
  • General Purpose - designed for general riding it is shaped between a dressage saddle and a jumping saddle. Due to the fact that tack is so expensive, most pleasure riders use a general purpose saddle

Saddle Sizes

It is important that the saddle fits both the horse and the rider. (More about this in a later blog).

Saddles are measured from the pommel to the cantle. Standard sizes are 15" - 18". On saddles with a cut back head, measure from the stud at the side of the pommel to the cantle. The size of the saddle is determined, generally by the size of the rider but should never be too long on a horse's back as it would put too much pressure on his kidneys.

They are available in three widths - narrow, medium, and wide. Some pony saddles are also available in extra wide. The width is determined by the shape of the horse's back and withers.

Anatomy Of A Saddle

Tree

The tree is the foundation of the saddle and is usually made of laminated wood but plastic and fiberglass are also used. A spring-tree saddle has a strip of flexible steel in the tree on both sides of the waist which gives the saddle a less rigid feel for both horse and rider but they are more expensive to buy. Quality saddles are usually stamped with the name or logo of the manufacturer on the panel along with the size. Sometimes it is on a metal plate. On older saddles, this was stamped onto the stirrup-bar.

Seat

The seat is the top of the saddle, between the pommel and cantle, where the rider sits. It is formed by strips of webbing stretched across the tree. It is then padded and covered with leather or a synthetic material. The deeper the seat the more secure the rider will be.

Girth Straps Or Billets

These are attached to the webbing strips that form the seat. The first strap is attached to one piece of webbing and the second and third straps are attached to another. For safety reasons, you should always attach your girth to the first strap and either the second or third, never the second and third.

Stirrup-Bars

These are attached to the tree. They should be open-ended to allow the stirrup-leathers to slide off should the rider fall from the horse and get their foot stuck in the stirrup. On most saddles, the stirrup-bars have a hinge that can be turned up to prevent the stirrups from falling off a horse that is being lead or lunged. NEVER ride with the bar turned up. Bars that are not open-ended or are in the shape of a sideways D (usually on a pony pad) should never be used without safety stirrups.

Panel

This is the underside of the saddle that lies against the horse's sides. Some panels have knee rolls at the front and some even have thigh rolls behind the rider's leg, all designed help keep the rider's leg in the optimal position. It usually comes down almost to the bottom of the saddle flap. A half-panel reaches halfway down the saddle flap and has a large sweat flap to stop the girth buckle from pinching the horse's skin. These are not very common anymore.

Flap

The flap is the outer part, that covers the panel, where the rider's leg lies. The size and shape is determined by the style and use of the saddle as it helps position the rider's leg correctly.

Gullet

The gullet is actually the space between the bars of the saddle but is generally known as the space under the saddle and rests above the horse's spine. There should be enough clearance so that no part of the saddle is ever in contact with the horse's spine. The width of some saddles can be altered with interchangeable gullets.

Waist Or Twist

This is between the seat and the pommel. The size of the waist can greatly affect the comfort of the saddle for the rider.

Pommel

The very front of the saddle. It is higher than the seat and helps provide stability for the rider. It needs to be high enough so that it does not rub against the horse's withers. The pommel of a jumping saddle is lower than that of a dressage saddle allowing the rider to ride in two-point (forward) position.

Cantle

The back of the saddle that is higher than the seat. It, along with the pommel, gives the rider security in the saddle.

Skirt

A small piece of leather that covers the stirrup bar to help prevent rubbing on the inside of the rider's leg.

Stuffing

The stuffing in a saddle is normally wool, synthetic, foam, or felt. The saddle should be stuffed evenly and never feel lumpy. As saddles get older they sometimes need re-stuffing. This can also be called re-flocking.

D Rings

Metal rings attached to the saddle and used to attach various items. The ones on the front are mainly used to connect a breastplate. They are also useful for attaching a strap for novice riders who are learning to balance and riding on the lunge. The ones on the sides near the seat can be used for saddle bags. Not all saddles have the rear D rings.

Parts Of A SaddleParts of a Saddle, Horse EquipmentIMAGE OF A SADDLE

Girths

This is what holds the saddle in place so it is vital that it fits comfortably and correctly. The size is measured from end to end including the buckles. They can be made from many different materials.

  • Leather - if correctly looked after these look very smart and are comfortable for the horse but are expensive to buy.
  • Three-Fold - is a single piece of soft leather, cut straight and folded to form three layers with two buckles at each end. Between the folds, there should be a piece of flannel or other material, which should be soaked occasionally in neatsfoot oil to keep the leather soft. The folded edge should be towards the front of the horse.
  • Balding - one piece of leather with two buckles on each end. The center part is divided into three strips. They are crossed over and stitched in the middle. This reduces the width of the girth behind the elbow of the horse where it could cause girth galls. Because the leather is in strips make sure they do not pinch the horse's skin between them.
  • Atherstone - made of one piece of leather with two buckles on each end, it is shaped similar to the Balding but it has a leather strip stitched down the center on the outside to hold the shape. This style also helps prevent girth galls.
  • Fleece - this is a synthetic material with a fleece lining designed to wick away moisture from the horse's skin. These are popular with hunt seat riders.
  • Dressage - these girths also come in various different materials and are usually much shorter than regular girths as the billets on a dressage saddle are longer.

Stirrup Irons

These should be made of stainless steel and be the correct size for the person riding the horse. They should allow ½" at each side of the rider's boot. Rubber treads help to stop the foot from slipping. It is very dangerous for a person to ride with stirrups that are too big, allowing their foot to slip all the way through. Children and small adults who, if they got their foot caught in the stirrup and fell off, might not be heavy enough to pull the stirrup leather off the stirrup bar should use safety stirrups.

  • Peacock or Safety Stirrups - these stirrups have a thick roll of rubber along the outside of the iron. This rubber will easily snap off if someone falls from the horse making it far less likely that they will get their foot caught in the stirrup. The disadvantages are that it does not hang level as it is heavier on one side. The rubber perishes over time and needs to be replaced. They have also been known to bend under extreme pressure.
  • Bent Leg - these have a curve or bend on one side. The bend should be to the outside and bend towards the front. They hang straighter than the Peacock style but you may find that your foot slips out of them until you get used to how they feel.

It is essential to use a safety stirrup with a saddle that does not have an open-ended stirrup bar.

Stirrup Leathers

The stirrup leather passes through the stirrup bar and the gap in the top of the stirrup iron. They have a buckle to adjust the length. All leather stretches over time so make sure the holes are still level on each one. It is a good idea to regularly swap over the left and right leathers as the left one will stretch more because of the rider mounting from that side. Stirrup leathers should be shortened periodically at the buckle end so that they don't always wear in the same place. They can be made of different types of leather and other materials.

  • Ordinary Leather - if this is top quality leather it looks the smartest but can break under extreme pressure. They are usually used for showing.
  • Rawhide - these are virtually unbreakable and usually used by cross country riders. They can look thick and clumsy.
  • Buffalo Hide - these are also virtually unbreakable but are reddish in color and don't always match the color of the saddle. They are more prone to stretching than other leathers.
  • Synthetic - made from a synthetic material they are easy to clean. The thin material kind are flexible but crack and flake easily. The thick rubber kind aren't very pliable making it difficult to adjust the length.

Martingales

There are four different types of martingales. They are all used to help control the horse.

  • Running - this is attached to the girth and passes between the forelegs and through the neck strap. It then splits into two and each piece has a ring on the end. The reins pass through the rings. When fitted correctly the ring should reach up into the horse's throat or back to the withers. It should only come into play if the horse lifts his head too high. It should not be used to keep the horse's head down. The buckle on the neck strap should be on the left side and allow four fingers clearance between the strap and the withers. The straps with the rings on should not be twisted when passing the reins through.
  • Standing - this is attached to the girth and passes between the forelegs and through the neck strap. It is then attached to the back of a cavesson noseband (or the cavesson part of a flash noseband). It should be long enough to reach up to the horse's throat or back to the withers. The buckle on the neck strap should be on the left side and allow four fingers clearance. It is used to stop the horse from raising his head above the level of control. A standing martingale is more restrictive than a running martingale.
  • Irish - this is two rings connected with a strap approximately 4" long. It is used under the horse's neck with the reins passed through it. It is used to keep the reins in place and close to the horse's neck and to help prevent them from coming over the horse's neck should the rider fall off. It is often used in horse racing.
  • Bib - this is a combination of a running and Irish martingale. A bib fills the space where the running martingale divides into two. It is fitted the same way as a running martingale and has the same effect but also keeps the reins closer together.

Breastplate

There are various different types of breastplate but they are all designed to prevent the saddle from slipping backward. They attached to the D rings on the front of the saddle and between the forelegs and onto the girth. They should be tight enough to be effective but not so tight that they interfere with the horse's movement.

Crupper

This is used to stop a saddle or roller from slipping forwards. It is a loop that fits around the horse's dock and a strap which fastens onto the D ring on the back of the cantle. The part that fits around the dock can be made of soft folded leather but the more expensive ones are hollowed leather filled with crushed linseed which, when warmed by the horse's body heat, releases oil through the leather which reduces the chance of rubbing. They are most often used on small ponies with flat withers.

Saddle Pads

These come in all shapes and sizes and are used, under a saddle, to provide extra padding and to keep the underside of the saddle clean. They are fitted with webbing on each side and at the bottom. One saddle billet should pass through the webbing at the top and the girth should pass through the webbing at the bottom. This helps prevent the pad from slipping backward. When tacking up pull the pad up into the gullet of the saddle so that it doesn't put pressure on the horse's spine. Also, make sure that it lies flat under the saddle. If it is wrinkled in any way it will be uncomfortable and could cause pressure points on the horse's back. Pads can be fitted or rectangular in shape. Fitted pads should be the correct size for the saddle and be slightly bigger, about 2" all the way around. Generally, fitted pads are used for hunt seat riding whereas rectangular pads are used for dressage, jumpers, and cross country.

Types of Saddle Pads

  • Cotton Covered Foam - these are very popular and available in many different colors. They are easy to look after and can be machine washed. They are only semi-absorbent and shouldn't be used if they are damp. They should be washed regularly.
  • Sheepskin - these are the best as it is a natural fiber and absorbs sweat easily however they are expensive to buy.
  • Synthetic Sheepskin - these vary in price and quality. The types that absorb sweat are suitable but the other kinds should be avoided.
  • Felt - although not used very often anymore they are absorbent and good at minimizing pressure or concussion. They are expensive and difficult to keep clean.

No matter what kind of riding you do or what kind of tack you own it is very important to look after it and keep it clean and in good repair.

Previous Blog: Grooming A Horse
Next Blog: Tacking-up, Removing, and Maintaining Tack (Coming soon)

The content of this blog is copyrighted © and may not be reproduced in print or electronically without the written permission of White Rose Equestrian Center. It may be shared socially if linked back to this website. For more information contact us.

2 Comments

Identifying Horses

Horses and ponies come in all shapes and sizes and characteristics can vary enormously. Horses are identified not only by sex but also size (height), colors and markings, age, breed, temperament, and sometimes body style or suitability for a certain job.

A typical description could sound like - Quiet 15.2 h.h. Tb, bay mare. Four white socks, 10 years old, never raced, working on second level dressage movements. Along with a photograph and a short video, the above description tells you just about all you need to know about the horse. Below is a breakdown of the different descriptions and what they mean.

Sex

Of course a horse is either a male or female but there are also other distinctions within those categories as follows:

  • Foal - general term for a young horse, male or female
  • Yearling - a young horse of either gender between the age of one and two
  • Filly - a female horse under four years of age
  • Colt - a male horse under four years of age if he hasn't been gelded
  • Mare - a female horse over the age of four
  • Maiden Mare - a mare who has never been bred
  • Barren Mare - a mare who is not able to become pregnant for health or age reasons or has had at least one foal but isn't currently able to conceive
  • Gelding - a male horse who has been castrated
  • Stallion - a male, intact, horse (one who has not been castrated)
  • Sire - a male horse who has produced offspring
  • Dam - a female horse who has produced offspring

Size

A horse is measured to the highest point of the withers, on level ground, with a measuring stick. They are measured in 'hands' which equates to four inches. A pony is generally considered to measure up to 14.2 h.h. (hands high) and a horse 14.3 h.h. and taller. The exception to this rule are miniature horses. They are equines that measure less than 24 - 38 inches (depending on breed) but retain the physical characteristics of a horse. They are considered horses by their respective registries.

For some disciplines it is important to be able to prove the size of your horse with a measurement card. More information about this can be found on the United State Equestrian Federation website.

Colors

Horses' colors and markings vary enormously and don't always fall into one particular category. The following list identifies the most common descriptions:

  • Albino - white hair with pink skin
  • Appaloosa - although an appaloosa is technically a breed they are easily recognized by the markings of spots on some or all of their body. The variations are numerous. You can find more information on the Appaloosa Horse Club page.
  • Bay - brown with black points (points are generally described at lower leg, forelock, mane, and tail). Bays can be bright (almost chestnut), dark (almost black), and light.
  • Black - black with black points
  • Brown - brown with brown points
  • Buckskin - various shades of coat that resembles tanned deerskin. They can look similar to duns but do not have a dorsal stripe.
  • Chestnut - ginger or reddish all over with either the same colored mane and tail or a flaxen (light blonde) mane and tail. They can be liver chestnut (dark almost bay colored) or bright chestnut (bright ginger). A chestnut horse can also be referred to as a sorrel.
  • Dun - golden or mouse colored with a dark mane and tail. They have a list or dorsal stripe down their back. A grullo dun has tan/grey hairs with dark points.
  • Grey - either white or white and black hairs mixed
    • Iron Grey - mostly black
    • Light Grey - mostly white
    • Flea Bitten Grey - dark hairs in tufts
    • Dappled Grey - mottled markings
  • Paint - in America the Paint horse is a breed rather than a color which combines the characteristics of a Western stock horse with markings of white and dark colors. In the United Kingdom colored horses are described as:
    • Piebald - white and black
    • Skewbald - white and brown
  • Palomino - golden with a white or flaxen mane and tail
  • Cremello - a pale creamy color with pink skin, not to be confused with an albino
Chestnut mare with stripe, snip, and white pastern

There are wide variations within each of these categories and horses can change color throughout their lives. If a horse is none of the above it is described as odd colored although I have yet to come across a horse that can't be squeezed into one or more of the above categories.

Markings

Face

  • Blaze - broad white mark between the eyes and down the face
  • Flesh Marks - pink marks
  • Star - white mark on the forehead
  • Stripe - a thin white mark down the face
  • Snip - white mark near the nostril area
  • White Face - a blaze covering one or more eye

Eyes

  • Wall Eye - a white or blue eye

Leg

  • Ermine Marks - dark marks on white
  • Sock - white above the fetlock but below the knee or hock
  • Stocking - white to above the knee or hock
  • White Pastern - white on pastern but not over the fetlock
  • Whorl - a circle of hair

Age

Generally speaking a horse's age is calculated on January 1st from the year of its birth. Therefore a horse that was born on May 2nd of 2012 would be classed as a three year old on January 1st 2015 even though it hadn't reached it's birth date yet. Also see the descriptions of sex above in the this chapter for terminology to describe horses at various stages in their life.

Breed

There are so many different breeds of horses it would take up a whole section to write about them all. I will list the most popular breeds along with their characteristics.

  • Arabian - has a distinct dished face, high head and tail carriage and ranges is size from 14.1 - 15.1 h.h. They can, but don't always, have a hot temperament. Suitable for endurance riding, showing in hand and under saddle, and many other equestrian fields.
  • Andalusian - also known as the Pure Spanish Horse the breed originates from the Iberian Peninsular. They are strongly built yet elegant with long, thick manes and tails. They excel at dressage, showing, driving, and jumping. See pictures of White Rose Fandango our Andalusian.
  • Appaloosa - best known for their varied spotted markings their body types and sizes vary greatly ranging from 14 - 16 h.h. They are regularly used in both Western and English disciplines. See pictures of Sierra our appaloosa.
  • Belgian - a draught horse and one of the strongest of the heavy breeds it stands, on average, between 16.2 - 17 h.h. but can grow taller. They are normally light chestnut with a flaxen mane and tail. Generally used for pulling heavy weights but can also do well in the show ring and for pleasure riding.
  • Clydesdale - a draught horse named after the Clydesdale region of Scotland. They are energetic, well mannered, and showy and used for pulling heavy loads. The most well known are the Budweiser Clydesdales.
  • Friesian - originating from the Netherlands they are a light draught horse. They are nimble and elegant and normally stand around 15.3 h.h. but can range from 14.2 - 17 h.h. and more. Recognized for their shiny black coat, thick mane and tail and feathered legs they can be used for driving but also do well in other equestrian disciplines under saddle.
  • Lippizana - originating from the Andalusian horse the breed was developed in Austria and is synonymous with the Spanish Riding School of Vienna. They are famous for performing 'airs above the ground' and an excellent choice as a dressage horse at any level.
  • Morgan - one of the earliest breeds to be developed in the United States they were originally used as coach horses for harness racing. It's a compact, refined breed usually bay, black, or chestnut and versatile enough for most English and Western disciplines.
  • Mustang - free roaming horses in the west of North America they are direct descendants of the horses brought over by the Spanish. They are small and compact and very hardy. They usually range from 13 - 16 h.h. and do well in any number of English and Western disciplines. A mustang bred in the wild will have an identifying freeze brand on the left side of the neck. See pictures of Jellybean our mustang.
  • Paint - developed by breeding Quarter Horses, colored horses, and Thoroughbreds the Paint Horse is the fastest growing breed in North America. Their markings are white and any other color of the equine spectrum. They are generally considered to be Western horses but also do well in just about any equine discipline. They are especially good trail horses. See pictures of Moon our paint.
  • Percheron - an agile, powerful draught horse that originates from western France. They are usually grey or black and range from 16.2 to 17.3 h.h. They can be used for driving, fox hunting, and show jumping.
  • Quarter Horse - named for its ability to outrun other breeds over a distance of a quarter of a mile it's the most popular breed in the United States and the largest breed registry in the world. They are generally placid in nature and stocky in build and suitable for most Western discipline but also used in English equitation and driving.
  • Saddlebred - descended from riding horses and including breeds such as Thoroughbreds and Morgans they were used by officers during the American Civil War. Averaging between 15 - 16 h.h. they are spirited but have a gentle temperament. They are well known for their high-stepping action in the show ring but also do well in other English disciplines.
  • Shetland - a pony breed originating from the Shetland Isles off the coast of Scotland they range from 7 h.h. (28 inches) to 11.2 h.h. (46 inches). They are stocky and sturdy with a thick coat. They are used for driving and ridden by small children. American Shetlands tend to be more refined than their Scottish cousins.
  • Shire - a large draught horse ranging from 16 - 17 h.h. and over. They are very strong and capable of pulling heavy weights. They are used to draw carts and some breweries in the United Kingdom still use them to deliver supplies to public houses.
  • Tennessee Walking Horse - a gaited horse known for its flashy four-beat running walk. It has a calm temperament and popular as a riding horse both on trails and in the show ring.
  • Thoroughbred - a hot-bloodied horse known for speed and high spirit they are most often used as race horses. They also do well in combined training, show jumping, polo, and fox hunting.
  • Warmblood - a medium-weight horse descended from draughts whose bloodlines were influenced by the introduction of hot bloods (Arabians and thoroughbreds). They were originally bred in Europe and, depending on the country of origin, can be a Trekehner, Hanoverian, Holsteiner, Selle Français, Oldenburg, etc. Unlike most other breeds they do not have a closed stud book (the Trekehner is an exception) which means they allow breeding with other similar populations which promotes performance of the breed in general. They make excellent sport horses and perform well in show jumping and dressage.

Sport Horse - although not actually a breed in itself the term sport horse is used more frequently these days. It can be a variety of breeds suitable for eventing, dressage, show jumping, or hunt seat.

If I have missed off your favorite breed and would like me to add it please let me know and I'll add it.

Previous Blog - Stable Management Knowledge and Care of Horses (overview of the blog series)

Next Blog - Correctly Handling Horses


The content of this blog is copyrighted © and my not be reproduced in print or electronically without the written permission of White Rose Equestrian Center. It may be shared socially if linked back to this website. For more information contact us.

1 Comment

Stable Management Knowledge and Care of Horses

This blog series will set out the requirements and a study guide for anyone interested in learning more about the care of horses. It loosely follows the syllabus for the British Horse Society Assistant Instructor (BHS AI) examination and is the basic requirements needed for anyone considering caring for their own horse. The language has been Americanized for the current audience.

The British Horse Society is a world renowned organization dedicated to the well being of all equines, and those who care for them. They provide welfare services for horses and advice for owners. Their campaigning and lobbying for major equestrian issues on behalf of both horses and riders brings about changes in procedures and laws, and enhances the lives all those involved in the horse community world wide. They also offer the world's leading equestrian qualifications and approval systems.

The sections are broken down as follows:

  • Identifying Horses
  • Correctly Handling Horses
  • Grooming a Horse
  • Basic Horse Equipment and Use
  • Tacking-up, Removing, and Maintaining Tack
  • Braiding, Clipping, and Trimming Horses
  • Shoeing and Hoof Care
  • Watering, Feeding, and Fittening Horses
  • The Care Of Stabled and Grass Kept Horses
  • Fitting Tack and Equipment and the Care of a Horse in Competition
  • Horse Health, Anatomy, and Physiology
  • How to Lunge a Fit Horse for Exercise
  • Fitting and Evaluation Specialized Tack and Equipment
  • Conformation and 'Way of Going'
  • Managing an Equestrian Business
Cooling off on at warm day.
Cooling off on a warm day.

White Rose Equestrian Center in the Lake Norman area of Charlotte, NC offers stable management classes suitable for anyone interested in learning about or furthering their education regarding the care, health, and well being of horses. These classes can also be tailored to home school groups. For more information and costs please contact us or give us a call 704-559-9122.

Next Blog - Identifying Horses


The content of this blog is copyrighted © and my not be reproduced in print or electronically without the written permission of White Rose Equestrian Center. It may be shared socially if linked back to this website. For more information contact us.